آموزش گرافیک 2 بعدی
موضوعات داغ

آموزش فارسی ایلاستریتر : کار با پنل لایه Illustrator CC

آموزش فارسی پنل لایه ادوبی ایلاستریتر Illustrator CC Layers panel

آموزش فارسی کار با پنل لایه ادوبی ایلاستریتر Illustrator CC Layers panel

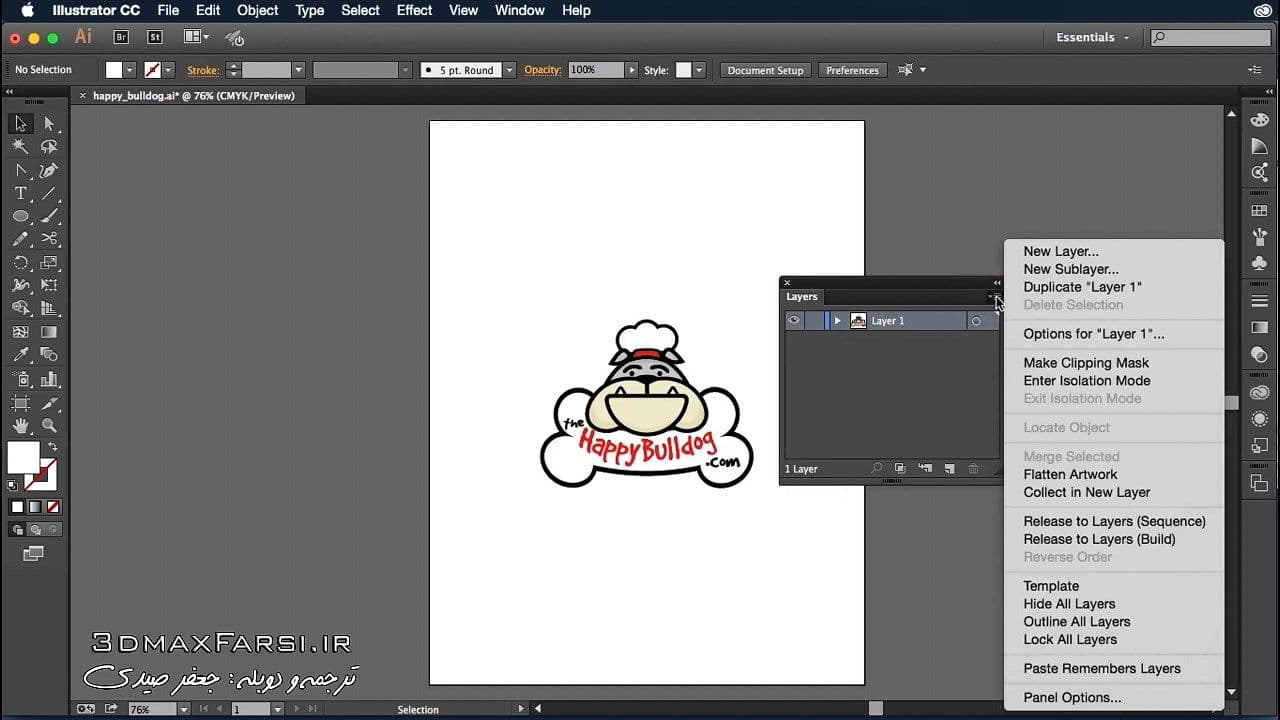
پنل لایه ادوبی ایلاستریتر : در بخش پنجم دوره آموزشی فارسی نرم افزار Illustrator CC ، به طور کامل در مورد لایه ها صحبت خواهیم کرد . درست مانند سایر نرم افزار های شرکت ادوبی، در  ادوبی ایلاستریتر هم میتوانید تمام محتواهای خودتان را لایه بندی کنید . به این معنی که این امکان برای شما وجود دارد که تمام آبجکت های خودتان را توسط لایه ها روی همدیگر بچینید و سازماندهی کنید.پنل لایه ها در سمت راست ورک اسپیس قرار دارد و آیکن آن هم شبیه 2 برگه هست که روی همدیگر افتاده اند.

در پنل لایه ادوبی ایلاستریتر ، امکان فعال کردن ویژگی ویزبلیتی (visibility) ، قفل کردن و تاگل سویچ (Toggle Switch) را دایم.

در پنل لایه ادوبی ایلاستریتر ، دکمه های اصلی locate object , Make and Release Clipping Mask ,Create New Sublayer , Create New layer هستند و لطفا توجه داشته باشید که وقتی تصویری را وارد  ادوبی ایلاستریتر کنید، آن را به طور پیش فرض داخل لایه شماره یک به اسم (Layer 1) قرار خواهد داد. به طور معمول ما دو لایه دارم. لایه معمولی و ساب لیر که فقط داخل لایه های معمولی قرار میگیرند و نحوه کار کردن با آنها را در ویدئو های بعدی، به شما یاد خواهم داد.در ادامه، با سایر آموزش های فارسی رایگان ادوبی ایلاستریتر ، با ما همراه باشید…

 ویدئو آموزشی Video Tutorials

پخش آنلاین ویدئو آموزش پنل لایه ادوبی ایلاستریتر  به زبان فارسی

نسخه کامل این آموزش فارسی را از لینک زیر دریافت کنید :

خرید 6 ساعت آموزش کامل Adobe Illustrator با دوبله فارسی :

دوره کامل آموزش فارسی ادوبی ایلاستریتر Adobe Illustrator : مقدماتی تا پیشرفته


Illustrator CC 2015 Essential Training Layers panel. you have this button which will allow you to locate a specific object. You have the Make and Release Clipping Mask button. You have a Create New Sublayer button, and you have a Create New Layer button. So, basically, you have two types of layers: regular layers and sublayers. Sublayers are just nested inside of regular layers and I'll show you how to work with those in a future movie. Inside the layers panel also, you will notice that you have the ability to control the visibility, the lock, and also the toggle switch for each layer right over here on the left hand side. So, the visibility switch turns the layer on and off. As you can see, when I turn that off, everything disappears. Click it back on, everything comes back in. If I click the toggle for the lock that means nothing out here can be done to this piece of artwork. So, for instance, you see how my pencil and a little circle with a line through it appears here. That means "Hey, you can't do anything". And when I try to make a selection or do something right now, I'm feverishly clicking my mouse, it's not doing anything, because that layer is locked. So, if you want any easy way to prevent certain pieces of artwork from being edited, or destroyed, or manipulated in any way, just put them on their own layer and lock that layer. To toggle this layer open to see all of the sublayers, all you have to do is click on this little triangle here. When you click on that, it's going to expand it down and show you all of the different sublayers here in the sublayers panel. And so, as you can see, this one has several different pieces that make up this bulldog logo. I can close that by clicking on the triangle again and I can unlock it by removing the lock symbol. You'll notice over here, there is a little circle which enables you to select or target specific layers or objects, and then move them around to different layers, if you choose. I have a movie covering this specifically later on in this chapter. Finally, the last thing you need to know about the layers panel is the layers panel dropdown menu. That's located here in the top right hand corner. When you see this, click on it, and you can open it up and see all of the options. Let me move this so you can see it just a little bit better. I'll move it over here and open it up. There we go. So, we have several different options here to create new layers, create new sublayers, duplicate the current layer, delete a selection that you might have. You can go in and view the layer options which we'll talk about a little bit later on. You can make clipping masks directly from here, enter isolation mode. You can also exit isolation mode, locate an object, merge selected artwork, flatten the artwork, collect into a new layer. That means if you had several objects selected, you could collect them and move them to a new layer. You could release things to layers. You can also create a template. You can hide all layers, outline all layers, or lock all layers. This is a very powerful dropdown menu where many of the key functions of working with layers are found. So, you want to make sure you are familiar with it's location, and everything it does. Now again, this is going to come with time, and learning more and more about layers, which we'll do throughout this chapter. But I just wanted to make you aware of it now. So, that's the brief overview of the layers panel. If you've got it out on screen like I do, you can dock it back by clicking and dragging it back. And I'll just place mine directly above the artboard's panel like I had it before. Or, you can simply reset the essentials workspace if that's the workspace that you're currently using. Now, let's go ahead and take a look at how we can start using layers to make our projects more efficient
telegram

دیدگاهتان را بنویسید

دکمه بازگشت به بالا